
Click here to see a list of previous articles.

Click the image to see larger version
Computer1: Meet Computer2
One of the greatest things to happen with computers was the ability to allow them to communicate. I remember the first time I set up a network in my house (it was just two computers), I was perfectly elated. To be able to take files from one computer and copy them (or just open them) on the machine I was on, rather than having to run upstairs, copy the file onto floppy, then run downstairs and copy it to my computer made my day -- nay, my year!
Networks at home (even if it's just two computers) are becoming commonplace. Many people today actually expect to have their computers communicate to one another. So this week, we'll be delving into how to set up the connectivity between Windows boxes. There won't be too much detail as to make one's head spin, but anything that is not mentioned here will have a reference so as not to leave you without guidance. Most of the images on this page are linked to a larger image. Click them to see the larger version.
 The first thing to make certain is that you have the right hardware. Most computers come with network cards these days (If you ever see the acronym NIC, it means Network Interface Card), but in case you are uncertain, go to the Device Manager on your system (Control Panel>System in Windows 9x and Control Panel>System>Hardware>Device Manager in XP and Windows 2000). If you see a reference to a network card like you see on the right (usually an Intel, Realtek, 3com or Dlink, but as long as it refers to Network Card, you should be fine), then you have one.
  To hook all the connections up, you will need cables that have ends that look like phone cables, but are much bigger. You can see the difference between the two on the image to the left. Cables like this can be purchased from most computer shops, whether they're independent or chain stores. They are called "network cables" or "patch cables" or sometimes "ethernet cables".
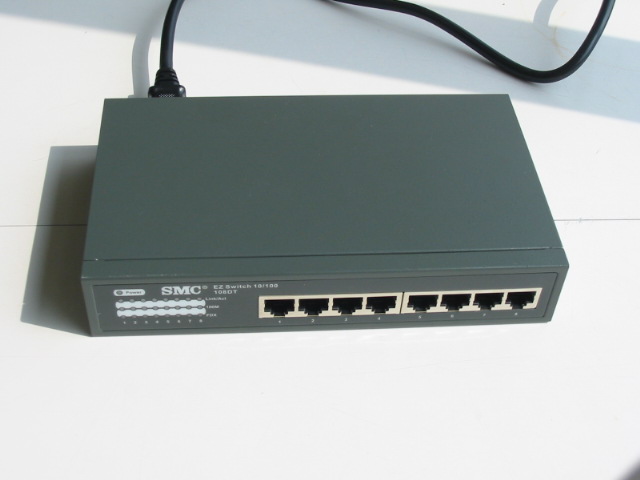 The other thing that is of paramount importance when setting up a network is having a hub, like the image on the right. Often, the device you have serving as a router will also serve as a hub. Notice the image to the right. The inserts kind of look like phone jacks. If your router (which can also look a little like the image to the left) has a bunch of those (typically 4 or more) that are labelled Ethernet, then your router can also be used as a hub. As the word implies, a hub is where all the data meets, then goes to its destination. When you plug your computers into the hub, do this when your computer is powered off. This way, when you start your machine, your computer may be able to receive its own address.
 As a point to note: When you plug your cables in to the hub, there should be a light that is aligned with the port you plugged the cable into that lights up. This is called a "link light". If a light does not show, and you have your computer powered on, make certain all connections are plugged in tightly. One of the primary causes of network problems is a loose cable. Even if it looks like it's plugged in, take it out, and plug it back in again. This point cannot be over-emphasized.
Once you have all the hardware and cabling in place, you are extremely close to network connectivity. Like humans, computers need an agreed-upon language to communicate with. This is called a "protocol". A very common protocol -- certainly one that you need in order to access the Internet -- is called TCP/IP. Sometimes we call it IP for short, as in, "What's your IP address?" It stands for Transmission Control Protocol/Internet Protocol, but you don't have to remember that. Once you have your computers plugged in and powered up, and if you are running Windows 9x/Me, you can go to the Start menu and type winipcfg and press enter, or if you run Windows 2000 or XP, you can use this file. When you download this file, save it to your c:\windows directory(or c:\winnt if you don't have a c:\windows directory). When you run this file, it will tell you what IP address your computer has. Make sure that the dropdown menu under Ethernet Adapter information shows your network card. Otherwise, you can change it from the dropdown menu. What you are looking for is the IP Address (not the Adapter Address). If it reads something like 192.168.1.100, then you're ready to share your files.
 You can skip this paragraph unless you are interested in trouble shooting. If it says either 0.0.0.0 or starts with 169.254, then you need to assign it an IP address. For those running Windows 9x or Me, go to Control Panel>Network>Tcp/IP Properties.
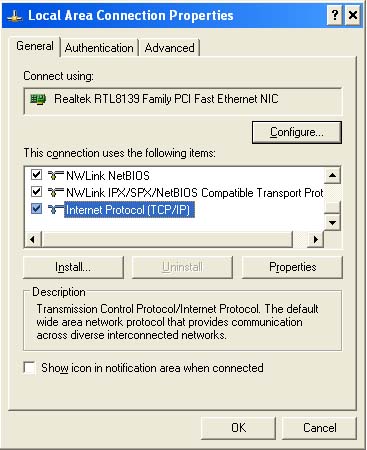
  In Windows XP/2000, go to Control Panel>Network>Right-Click Local Area Connection and select Properties, then select TCP/IP properties. Assign the IP address to 192.168.1.50. Assuming any other machines on the network also do not get an IP address, make sure their IP addresses are different (you can make the next one 192.168.1.51, then 52, and so forth). The Subnet mask can be set to 255.255.255.0. If you do not have Internet access then you don't have to worry about the gateway, or DNS or other such information.
A couple of more settings and we're done. If you're in a Windows 9x/ME environment, this is a piece of cake(we'll get to XP/2000 in a moment). Right-click Network Neighbourhood and select Properties. Click on File and Printer Sharing and make sure both boxes are checked. Click on the OK button and any other windows that present you with an OK button or an means of progressing (like "Finish"). You'll be asked to restart. After you finish restarting, open up Windows Explorer (windows-key+E or right-click My Computer and select Explore). From here, you can right-click any folder you want to share, and select Share Folder. From the other computer, double click the Network Neighbourhood icon, double click the name of the computer you find and you should see the contents of the shared folder.
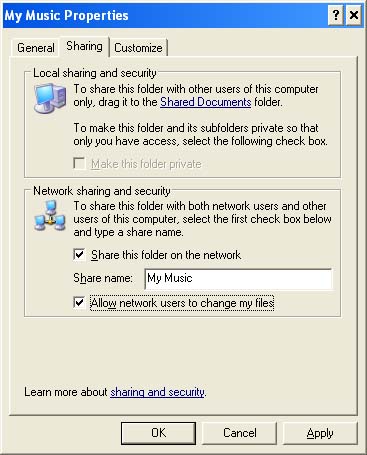 To share files in an XP/2000 environment, I would recommend enabling the Simple File Sharing option by opening Windows Explorer, select Tools>Options>View and scroll down to the bottom of Advanced Settings. There is a box that says Use Simple File Sharing that should have a checkmark in it. Click on OK. In Windows Explorer, right-click the folder you want to share and select Sharing and Security. The window on the left is what your window should look like (with the appropriate folder name). If you would like people to be able to change the files within that folder (including yourself!) from another computer, then enable the Allow Network Users to Change My Files option. If you just want others to be able to view the files, do not enable this option.
To share your printer, the method is similar for most Windows operating systems: If you go to the Printers folder, you can share your printer by right-clicking the printer and selecting share. The other computer can discover the printer in the same way that it found the files. The other computer should right-click the printer and select the "Connect" or "Install" option. You may require the drivers for the printer, much like how you installed it on the original computer.
One major note of consideration
If you have multiple computers with different versions of Windows, you may have problems when it comes to accessing each others' folders. If you find you are having problems in this regard, make certain that the username you log in to your machine with also exists on the other computer, along with the same password. If you are not certain what your username is, click on the Start menu and select Log Off. When you log off, you will be prompted with a window to log in again, showing you what name you used to log in with last. That is your username. If you never type a password, then you do not have one. This is a very common issue in mixed-Windows networks.That is home computer networking in a nutshell. There are so many details involved that your minds would be bored numb if you tried to read them all. However, if all of the above seems beyond your abilities, look for your local computer geek who knows something about networks. It's pretty easy after you've done it the first time, or after someone has shown you how it's done.
Next week, we'll look at the more impressive and effective innovations that came out in 2004. This is an excellent type of list that will let you know of the possibilities that are out there and the ones that are yet to come.
If you'd like to stop receiving this newsletter, click on the unsubscribe button below (it will bring up an e-mail to me) and just click send. Conversely, if you think someone else could benefit from receiving this, feel free to forward this mail to them. If you don't receive this currently and would like to subscribe, click on the subscribe button below and click on send.
If you have any comments, questions or concerns about this newsletter, feel free to e-mail me at sean@beggs.ca.
If you would like to UNSUBSCRIBE to this newsletter, click here or send an e-mail to sean@beggs.ca with "unsubscribe" in the newsletter.
If you would like to SUBSCRIBE to this newsletter, click here or send an e-mail to sean@beggs.ca with "subscribe" in the newsletter.
© Copyright 2005, Sean Beggs